In this tutorial you’ll learn how to setup rentals and bookings calendars in Magento 2 / Adobe Commerce. We’ll be going from the installation of Magento 2 all the way to checking in and out rental bookings. Sales Igniter offers a fully featured Magento Booking system with over 100+ features, many of which are exclusive and not offered by other booking platforms. If you are looking for a WooCommerce Booking Plugin we also have a tutorial on how to setup bookings in WooCommerce.
Install Magento 2 / Adobe Commerce
Note: We offer installation service for both Magento 2 and our Magento 2 Rental Extension, so if the below seems too complicated don’t worry we can handle it.
First you’ll want to make sure that your current web host can support the system requirements for Magento 2. Magento 2 is an open source shopping cart that has gained immense popularity because it has features such as multi-language multi-store capabilities, a huge extension ecosystem, it has no license fee for the community version, and has a large number of shipping and payment provider extensions from everything from Stripe, Braintree, PayPal, to UPS, FedEx, Canada Post, DHL, and many more.
After checking that your web host meets the system requirements you can choose to install Magento 2 via Softaculous if your web host has that which is like an auto-installer. Most people though will install via command line and composer. Composer is a package manager for PHP and allows you to install Magento 2. Please check the composer installation guide over at the Adobe Magento website. Basically you’ll want to:
- Setup your MySQL database
- Run this command with composer in command line:
composer create-project --repository-url=https://repo.magento.com/ magento/project-community-editionafter that you’ll want to also run the command below to install the data to the database and setup the env.php like this but substitute the credentials you are using for your database:
bin/magento setup:install \
--base-url=http://yourdomain.com \
--db-host=localhost \
--db-name=magento \
--db-user=magento \
--db-password=magento \
--admin-firstname=admin \
--admin-lastname=admin \
[email protected] \
--admin-user=admin \
--admin-password=admin123 \
--language=en_US \
--currency=USD \
--timezone=America/Chicago \
--use-rewrites=1 \
--search-engine=elasticsearch7 \
--elasticsearch-host=localhost \
--elasticsearch-port=9200 \
--elasticsearch-index-prefix=magento2 \
--elasticsearch-timeout=15
Install Sales Igniter Rental Booking Extension for Magento 2
Next we’ll install the Sales Igniter rental booking extension for Magento 2. The guide for installation is here, to access the guide though you’ll need to have purchased a license. The steps are basically:
- Setup the custom composer repos
- Run the composer require commands so that the module is installed to the vendor folder
- Run the bin/magento setup:upgrade so that the database tables are installed and the cache is cleared
Configure Your Rental Calendar Settings
Alright so the installation is now complete, you are now going to see all of the Rental menu options in your Magento 2 site:
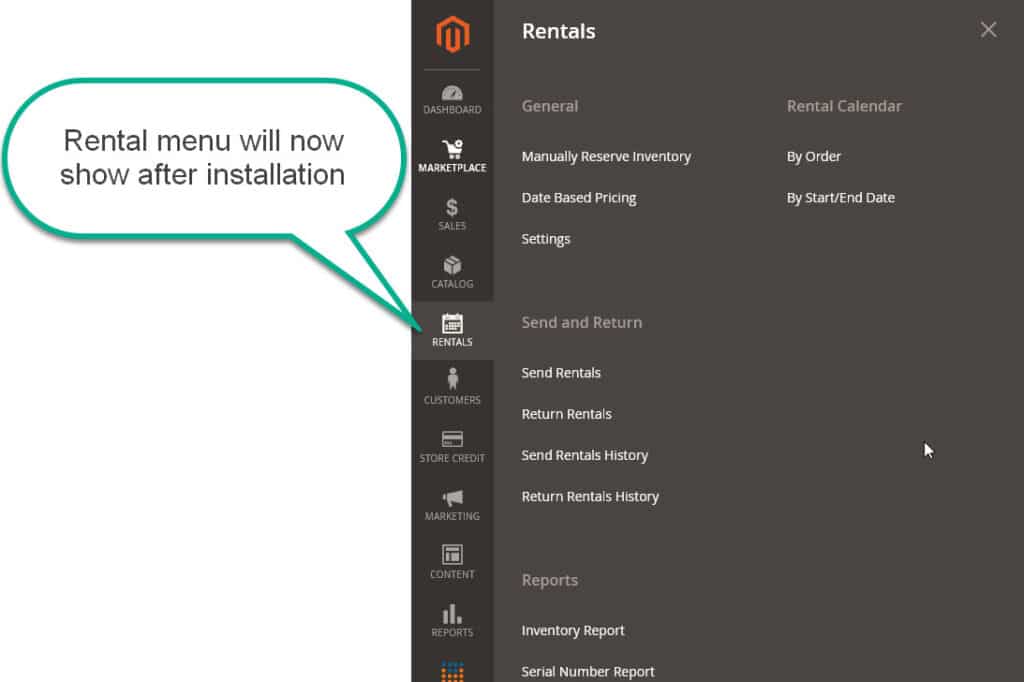
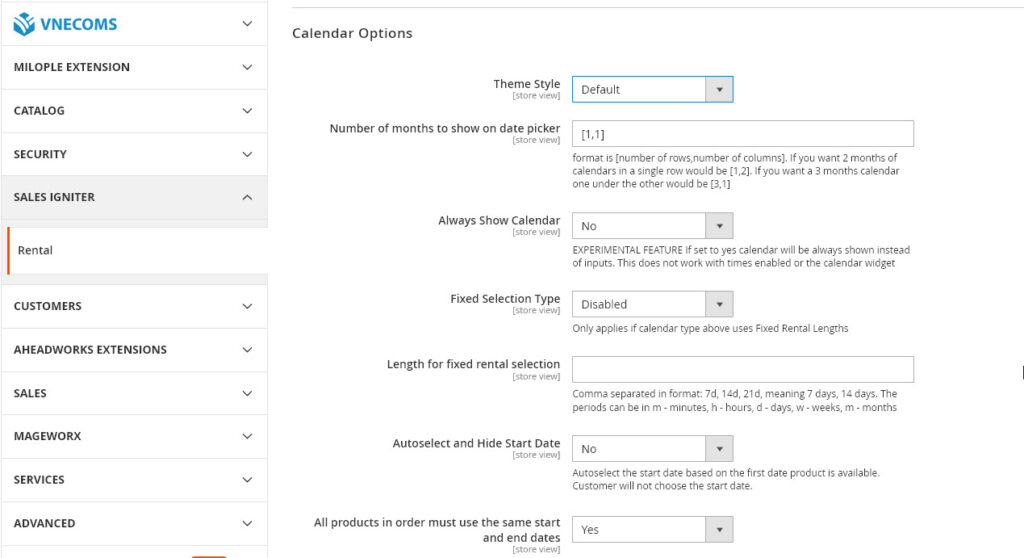
In this area we can setup a few things such as:
- Theme Style: the color and font style of the rental booking calendar
- How many months of the calendar show at a time
- If you want to offer fixed length rental bookings rather than open bookings of any dates / time
- If you want to have the rental calendar use the same rental start and end dates for all products in a rental order or not
- If all products in the rental order must use the same start and end dates
Configure Turnover (Buffer) and Store Hours and Holidays
Next in Rentals > Settings > Turnover Time area you can decide if you want to add a buffer time before and after each rental to account for things like delivery / shipping days, cleaning time, restocking time, etc. So for example if you have a rental from January 5 – 7 and set a turnover / buffer time before the rental of 2 days and after of 1 day, then the rental will really be reserved from January 3 – 8 as far as blocking out of the rental inventory from other reservations.
Add Some Rental Bookings Reservation Products
Next let’s go to catalog > products in the admin area and add a reservation product:

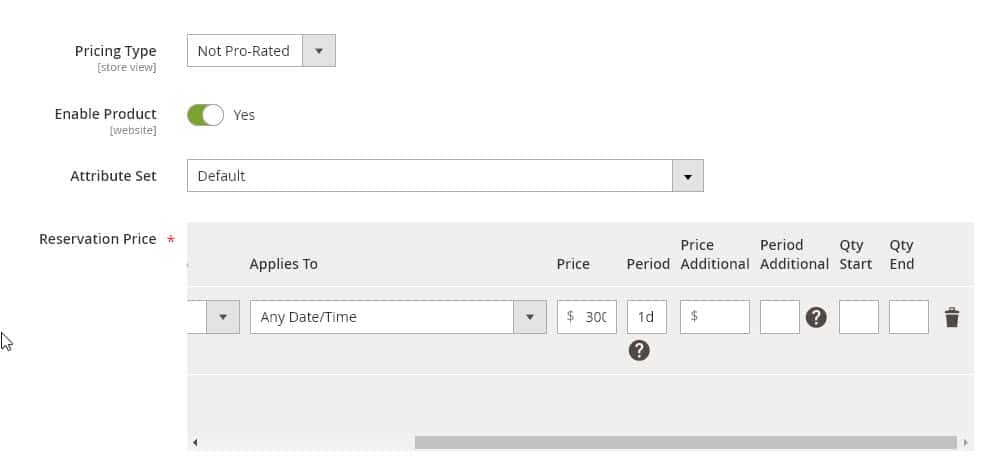
On the add product page you’ll first focus on adding the name, description, pricing and inventory for your rental product. Let’s add one we’ll call “Slice of Paradise Ocean View Cottage” and we’ll set the pricing to be $300 for 1 day:
Setup Your Inventory Quantity and Rental Product Type
We’ll assume we only have 1 inventory of this product, if we had 5 of these cottages we could enter 5 here:
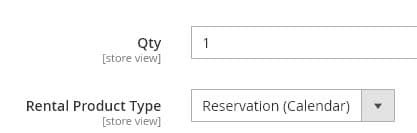
For the Rental Product Type we’ll set it to Reservation (Calendar)
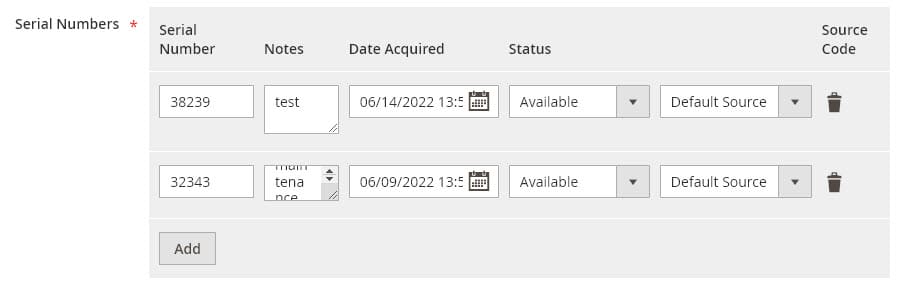
Add Serial Numbers / Barcode Tracking (optional)
If you want to track each piece of inventory individually instead of use quantity based tracking for checkout and checkin then you’ll want to enable the serial numbers feature. When using serial number based tracking when you checkout you’ll chose which serial number to assign to an order, and when you checkin you’ll confirm what serial numbers are being checked in.
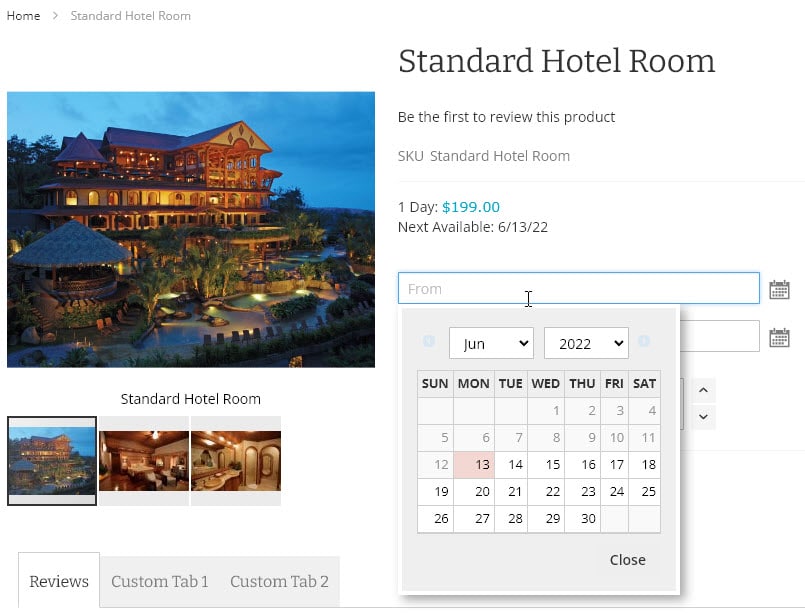
Check The Reservation Product On Your Customer Side Website
After saving the product to the product categories you want, you can checkout how the product looks on your website. You can also place a test order so that you can try processing your first rental order.
Setup Your Rental Contract PDF and Online Signatures (optional)

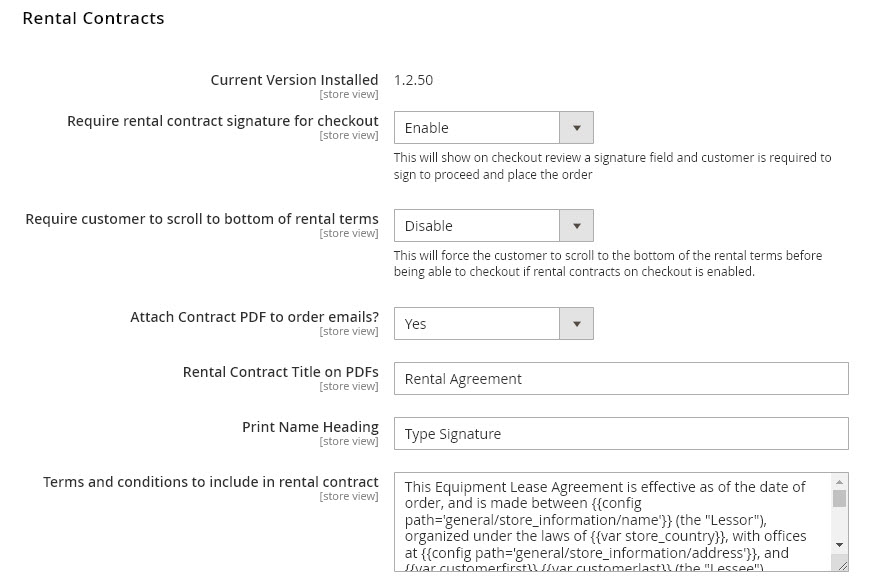
After enabling it your clients will see the rental contract text on checkout and they can either type their signature or use touch signing (if on a device like a phone or tablet) or with their mouse if they are using a desktop / laptop computer.
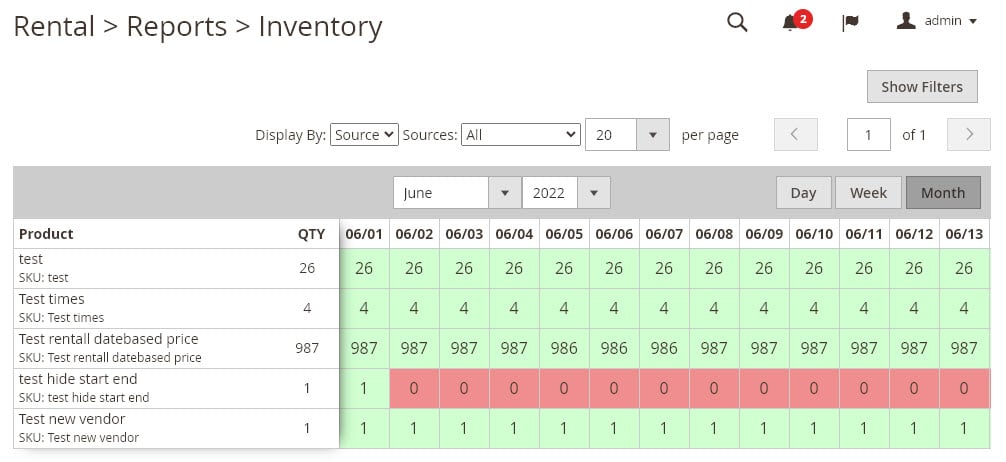
View Rental Inventory Reports
All rental orders will sync to the rental inventory management system. A complete detailed admin grid is available for viewing all of the rental inventory at once:
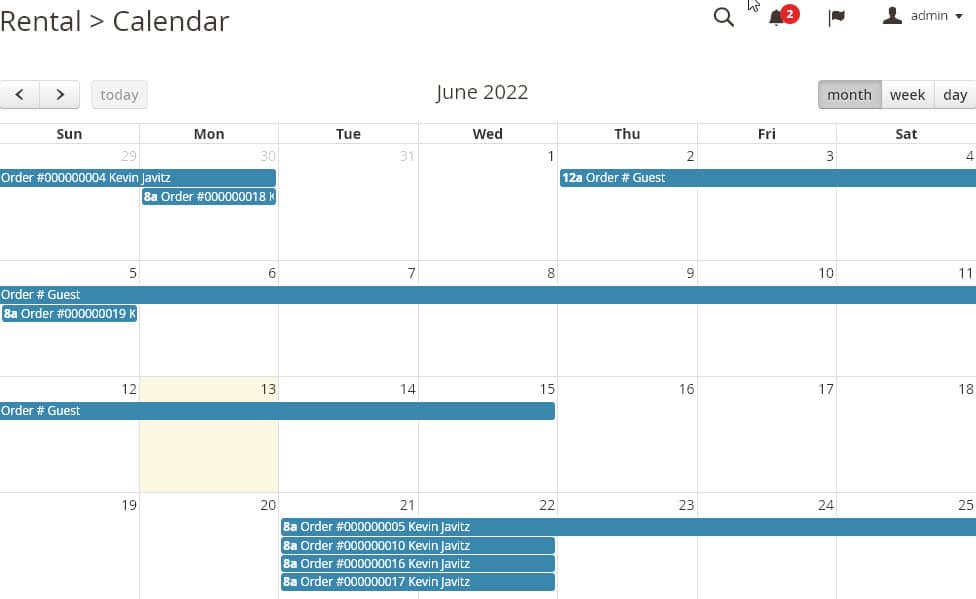
As well as a more typical orders by date type report using full calendar:
Checkout and Check-in Rentals and Bookings
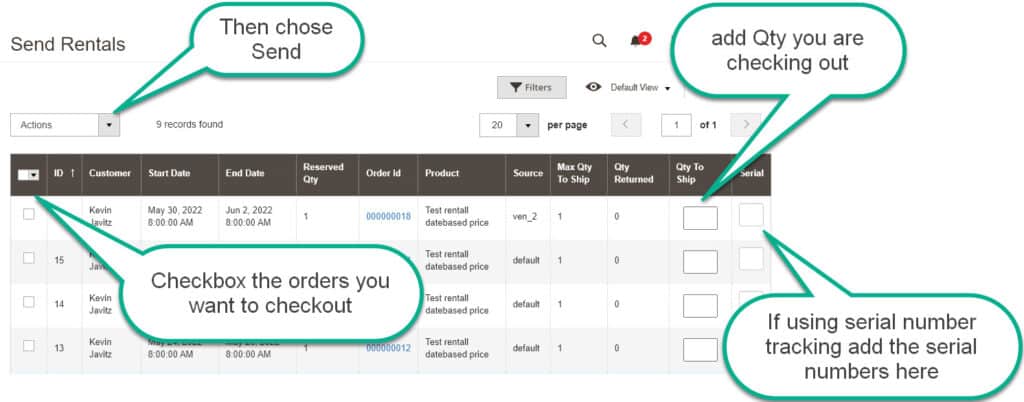
Any orders that are placed for reservation products will show up in the Rentals > Send and Rentals > Return area. This is again an optional feature you are not required to use it, but it can be useful to improve tracking of your orders.
As a use case say you are a bicycle rental store and you get 10 reservations for June 14. You will come to the Rentals > Send page and you’ll see a grid of all the pending rental orders by date:
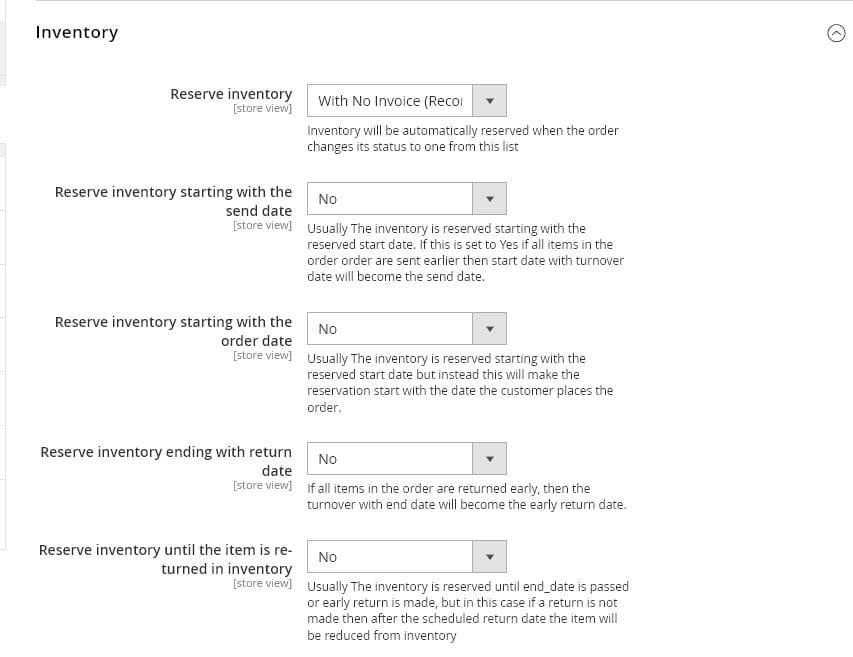
Advanced: Fine Tune Your Rental Inventory Tracking
Not all rental businesses track their rental inventory the same way, thus we’ve built the Sales Igniter rental booking system to be as flexible as possible. Please check the Rentals > Settings > Inventory area to set it up the best way for your rental store: