
Overview #
Serials track each physical unit of a rental product: this car, that laptop, the third stroller on the shelf. A product’s stock tells you how many units you have. Its serials tell you which ones are out, which are back, which are in for repair and how much each one earns.
Every serial has a code (the one you print on its label), a status, the date you acquired the unit, what it cost and a notes field. When you send a rental out you choose which serials go, and when it comes back you choose which serials returned, so every movement is recorded against a real unit.
Serials are part of Rentals & Bookings Regular and Pro.
Turn on serial tracking and add serials #
- Edit the product and scroll down to the Rentals & Bookings box.
- Open the Inventory tab and tick the Use Serial Tracking? box. A Serials table opens underneath.
- Click + Add serial and type the code, then set the status, the date acquired, the cost and any notes.
Each row saves as soon as you leave it, so there is nothing to click before Update. The × at the end of a row removes that serial, and its send and return history is kept.
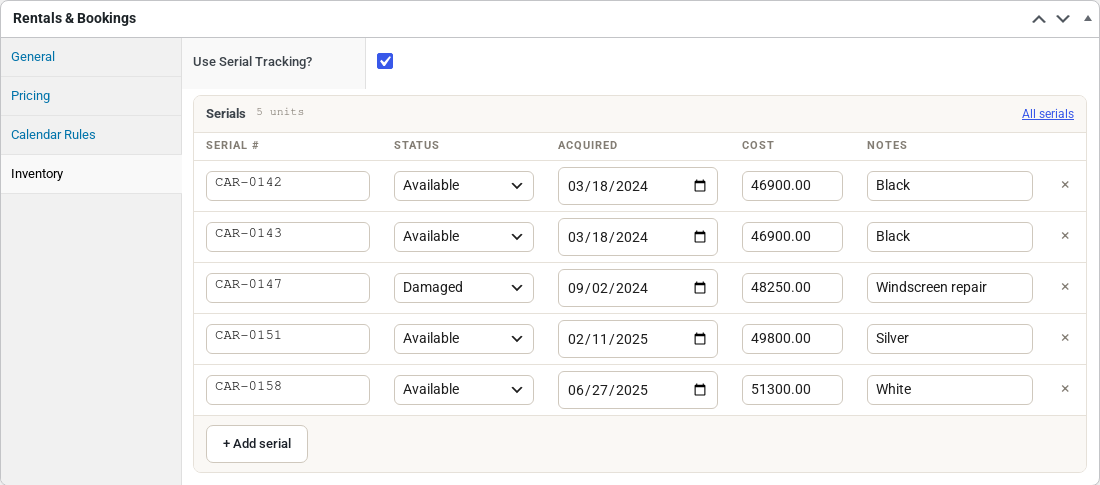
Add one serial for each physical unit. A short prefix and a number works well, for example CAR-0142 or MBP-2231: it is what gets printed on the label and read out over the phone. The Serials table won’t accept the same code twice on one product, and keeping codes unique across the whole shop avoids mix-ups when you scan. If you tag units with RFID instead of printed labels, program each tag with the serial code.
The Serials list #
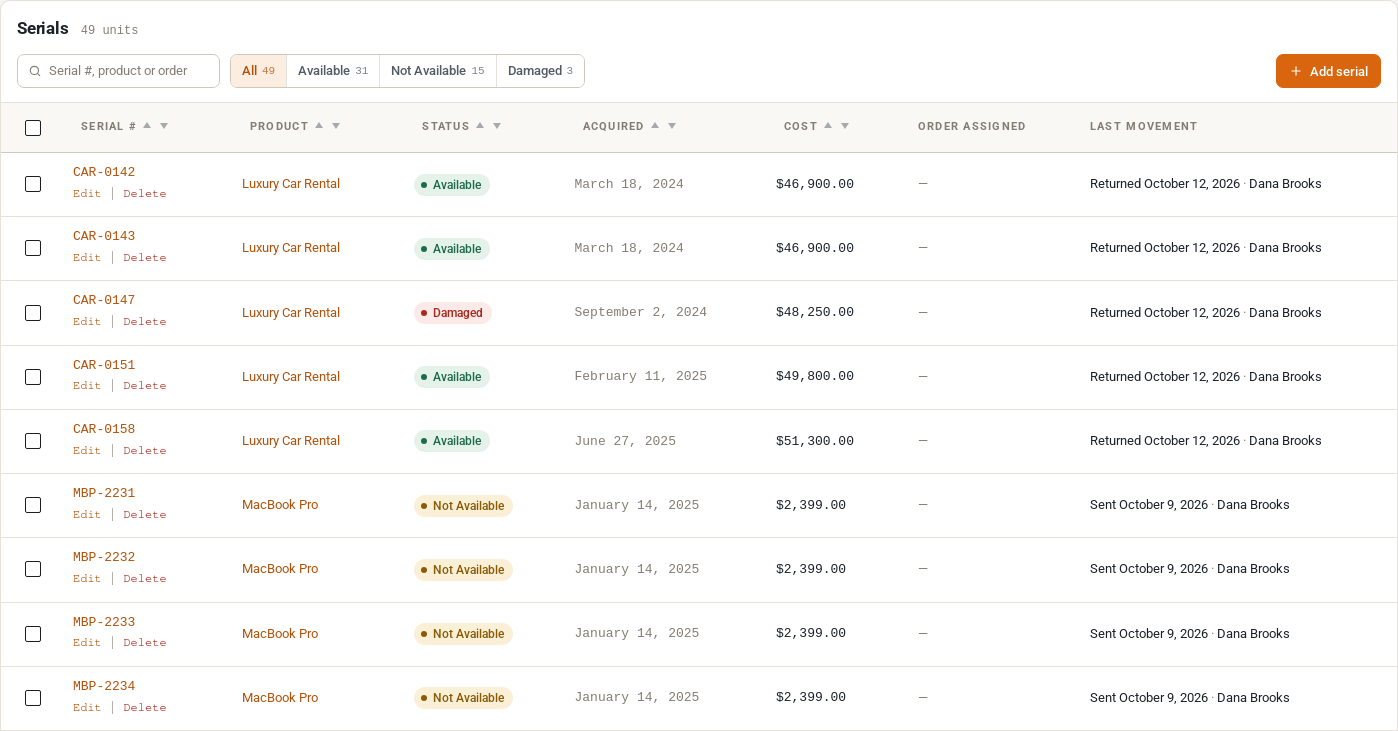
Rentals → Serials lists every serial on every product. Use it to find a unit, see what is on the shelf and print labels.
- The status buttons filter the list to Available, Not Available or Damaged units, with a count on each.
- The search box finds a serial by its code or its product name.
- Last movement shows the most recent send or return of each unit and who recorded it.
- Add serial creates a serial from here, if you would rather not go through the product.
Serial statuses #
| Status | What it means | How it changes |
|---|---|---|
| Available | On the shelf. Only Available units are offered when you send a rental. | New serials start as Available, and a unit goes back to Available automatically when it is returned. |
| Not Available | Out on hire, or held back. | Set automatically when the unit is sent. You can also set it by hand. |
| Damaged | Withdrawn, for example in for repair. Never offered when you send. | Set by you, in the product’s Serials table or on the serial’s own page. |
Returning a unit always puts it back to Available. If it comes back damaged, process the return first and then change its status.
Developers can add statuses, such as In maintenance, with the sibooking_serial_status filter. Any status other than Available keeps the unit off the Send screen.
Edit a serial #
Click a serial’s code in the list to open it. The top of the page shows the product and the current status, and every field can be changed: the code, the product, the status, the date acquired, the cost and the notes.
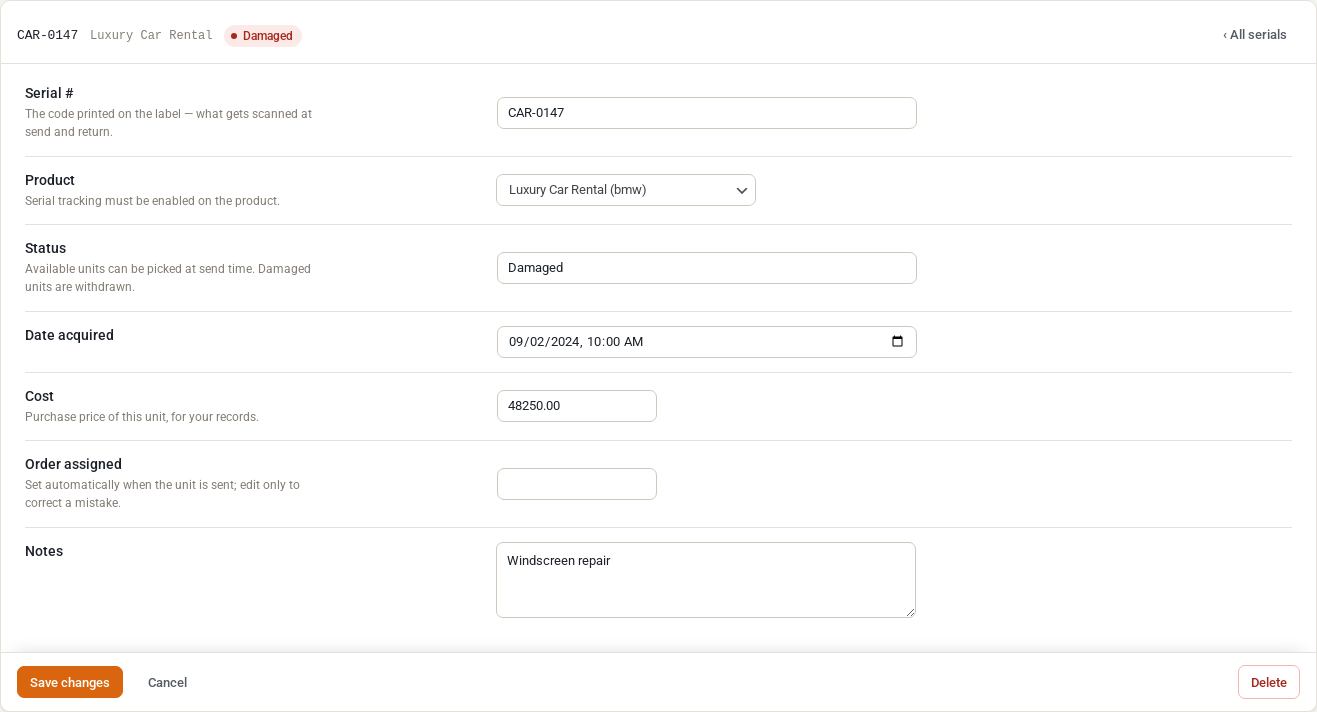
Fill in Date acquired. The Usage Report measures each unit from that date, so a unit you bought last month doesn’t count as idle for the months before you owned it.
Print barcode and QR code labels #
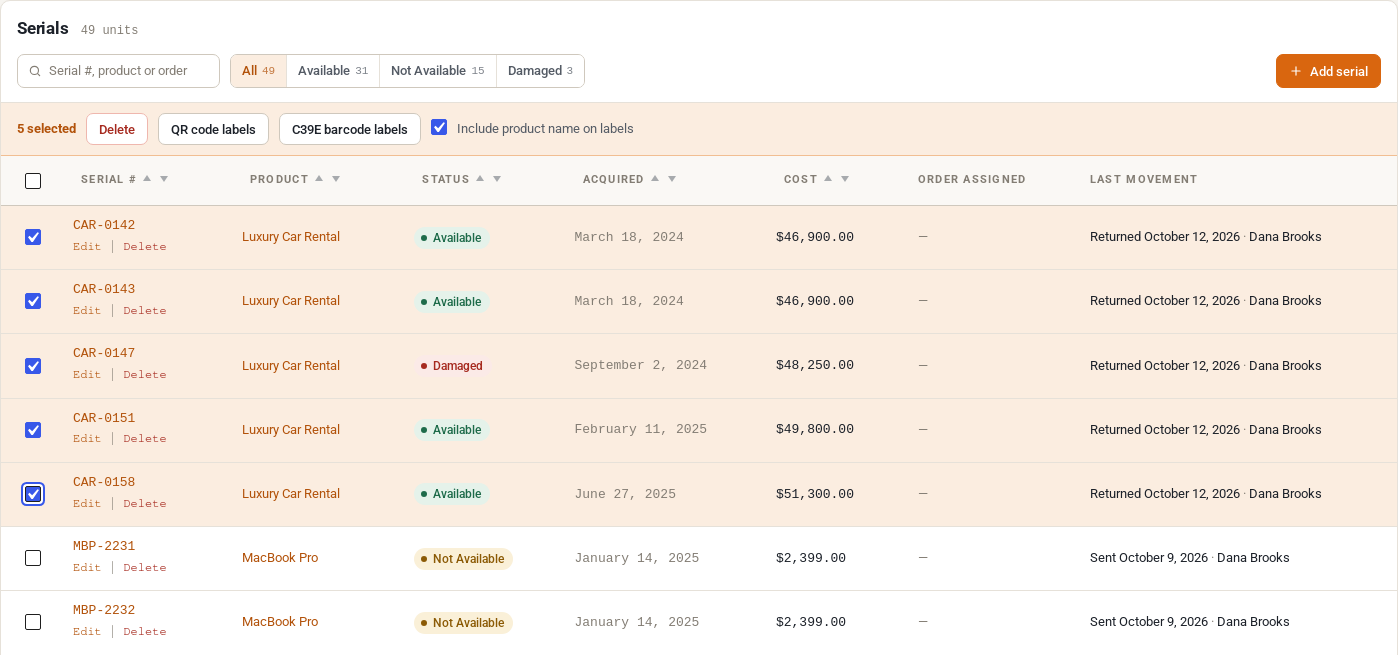
- In Rentals → Serials, tick the serials you want labels for.
- In the bar that appears above the list, click QR code labels or C39E barcode labels.
- Leave Include product name on labels ticked to print the product name under each code.
The labels download as a PDF.
The QR sheet puts five codes on a row, with the product name underneath. The QR code carries the serial, but the serial itself isn’t printed as text, so use the barcode sheet if your staff need to read it by eye.

The barcode sheet uses Code 39, three to a row, with the serial printed under each barcode.
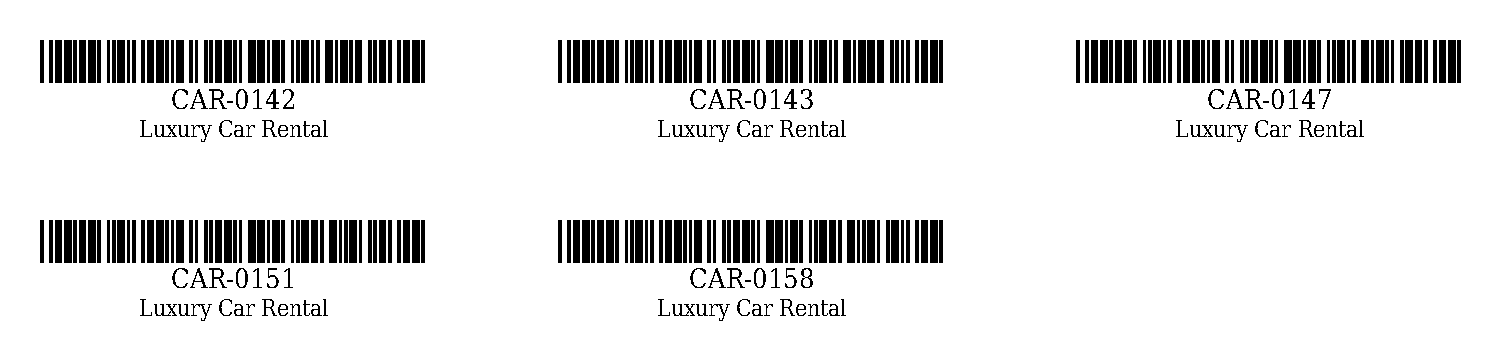
Both are plain A4 sheets, not laid out for a particular brand of label, so print a test page first, or print onto full-page sticker paper and cut the labels out.
Scanning labels #
A USB or Bluetooth barcode scanner types the code as if it were a keyboard. Scan a label into the search box on Rentals → Serials to pull up that unit, or into the Movement History search to see every hire it has been out on. To send and return equipment by scanning from a phone or handheld app, use the REST API’s scan endpoints, described in Sending & Returning Rentals, and Serial Codes.
Send (check out) and return (check in) serials #
Rentals → Send lists the bookings waiting to go out. When the product has serial tracking switched on and at least one serial, each of its bookings has a Serials box:
- Tick the booking.
- Check Qty to send.
- Click the Serials box and choose the units you are handing over. Only that product’s Available serials are listed, and you can choose up to the number of units still to go out.
- Click Send selected.
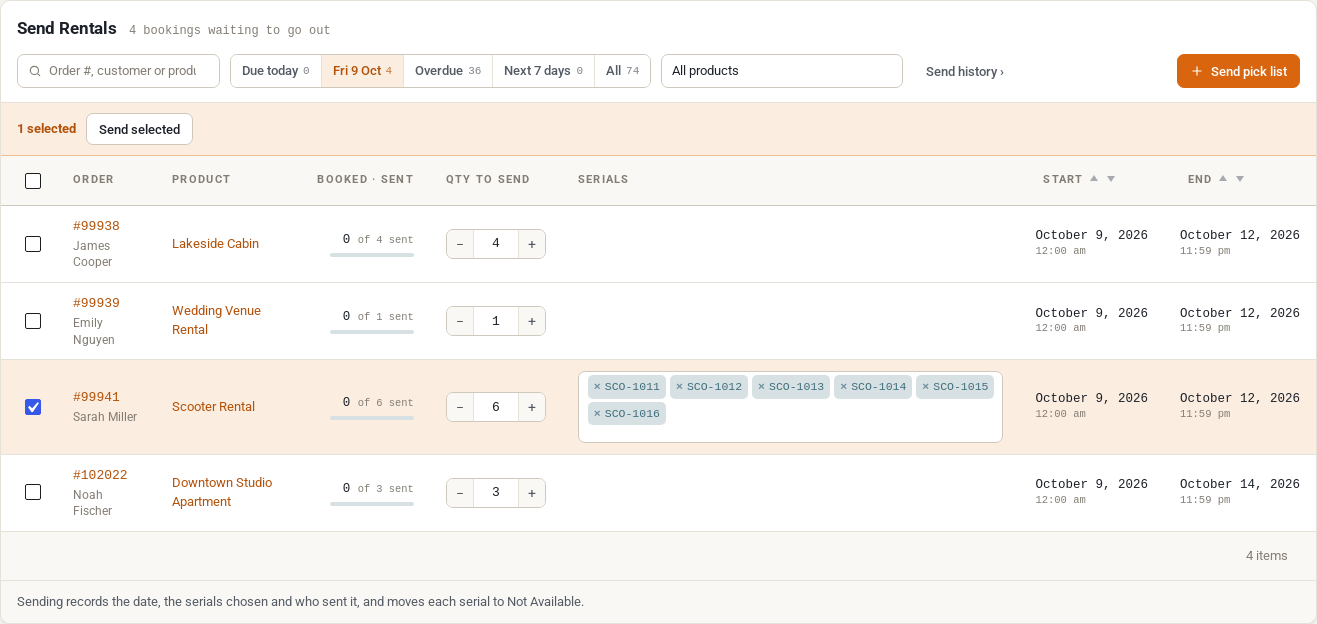
Sending records the date, the serials and who sent them, marks each serial Not Available and emails the customer (the Rentals Shipped email under WooCommerce → Settings → Emails). Rows without a Serials box are products that don’t track serials, and they are sent by quantity only. You can also send a tracked product without choosing serials: the hire is recorded, but no unit is tied to it.
Rentals → Return works the same way for bookings that are out. Its Serials box lists only the units that went out on that booking and haven’t come back yet. Choose the ones being returned, check Qty to return and click Return selected. Each returned serial goes back to Available, and the customer gets the Rentals Returned email.
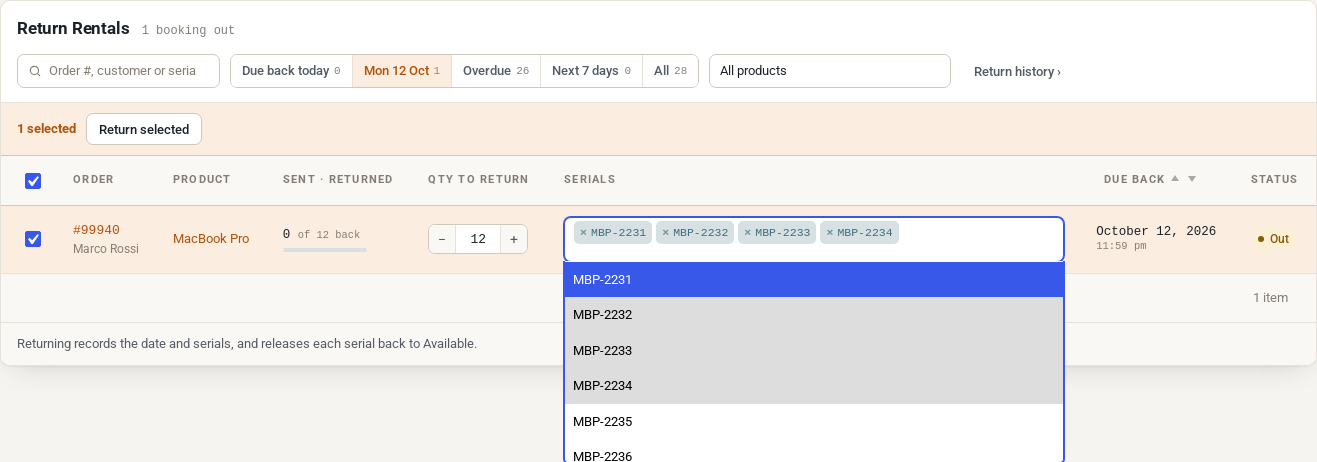
For pick lists, partial sends and the other options on these two screens, see Send and Return.
Movement history #
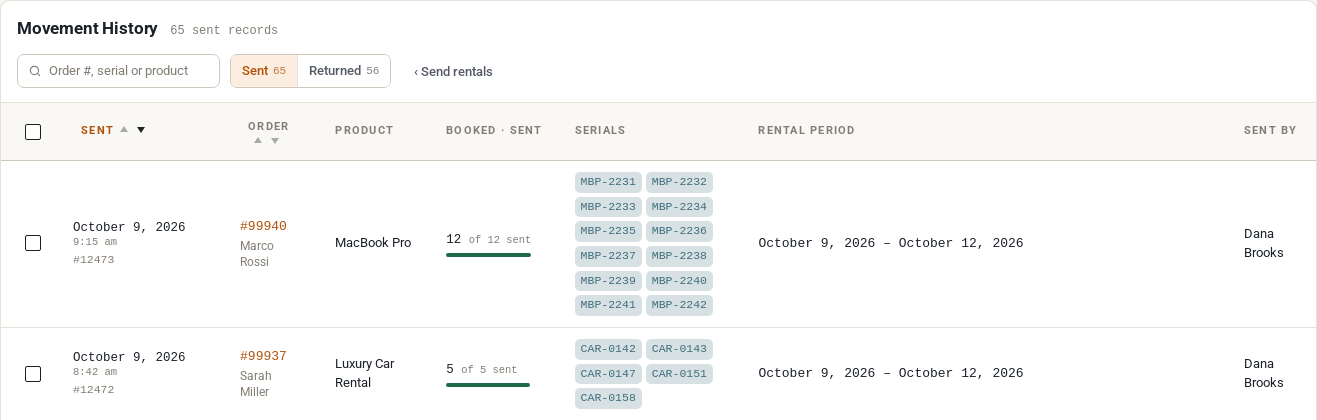
The Send history link on the Send screen and Return history on the Return screen open Movement History. Its Sent and Returned tabs list every movement with the order and customer, the product, the quantity, the serials, the rental period and the member of staff who recorded it. Search for a serial to trace one unit.
Utilisation and revenue per serial #
Rentals → Usage Report has a By serial view. It shows how hard each unit works over a 30, 90 or 365-day window and whether it pays for itself. The status column sits alongside, so a unit nobody rents is easy to tell apart from one that is in the workshop.
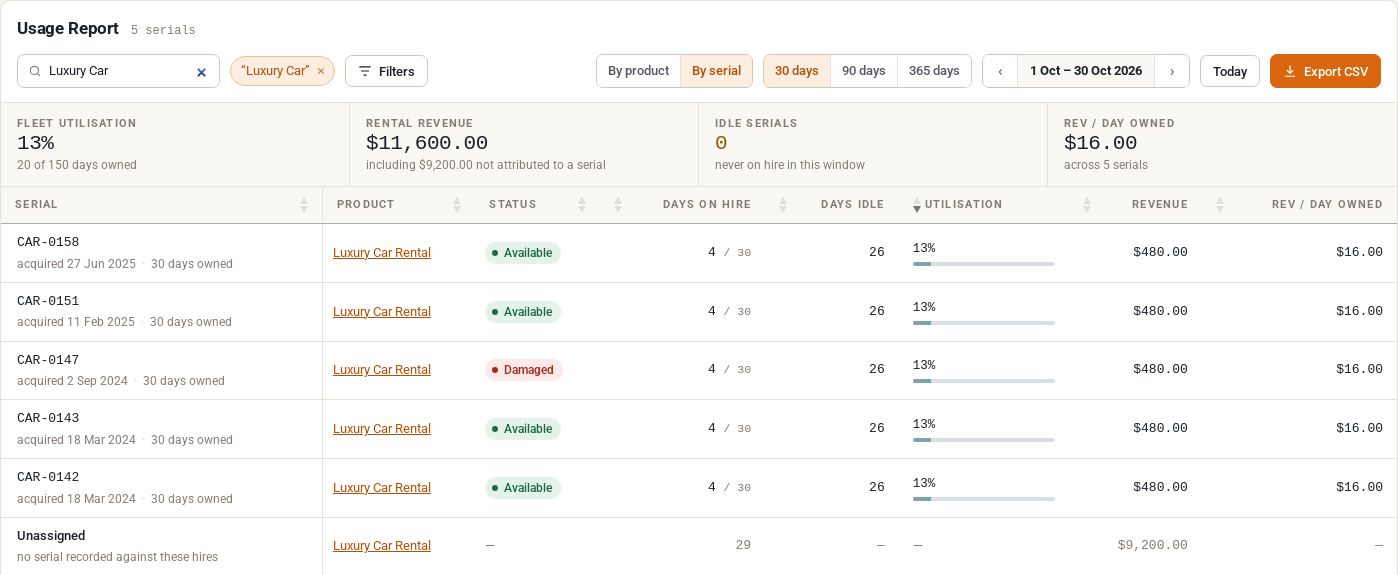
- Days on hire counts the booked days of every hire the unit was sent out on, within the window.
- A hire’s revenue is split across the units on the order line: five cars sent on one $2,400 line earn $480 each.
- Utilisation and Rev / day owned are measured from the serial’s date acquired, not from the start of the window.
- Hires sent without serials, or sent before you switched tracking on, appear in an Unassigned row for the product, so no revenue goes missing.
- Export CSV downloads every serial in the view, not just the page on screen.


