- Max / Min Rental Period
- Turnover Time and Rental Start Padding
- Inventory
- Reserve inventory
- Reserve inventory starting with the send date
- Reserve inventory ending with return date
- Reserve inventory until the item is returned in inventory
- Allow Overbooking for all products
- Admin is allowed to overbook all products
- If Admin is allowed to overbook then a warning will show if overbooking
- Add to price calculation number - Count an overnight rental as 2 days
- Number of price points to show in Admin Catalog Grid
- Special Pricing Dates
- Show next available date
- Sort Price List by Period
- Sort Price List Type
- Show prices in table format on product view
- Product Details page
- Store Hours / Holidays / Blackout Dates
- Hour for Next Day
- Hotel / Property Rental Mode
- Time Increment On Time Of Day Drop Down Fields
- Store Open Time
- Store Close Time
- Store Open Time (Monday - Sunday)
- Exclude Dates From Price or Calendar or Turnover
- Disabled Days of week for start date
- Disabled Days of week for end date
- Disabled Days of week for both start date and end date
- Exclude disabled days of week from price, calendar, turnover
Max / Min Rental Period #
Max period from now a reservation can be started or ended #
So as an example say today is September 1, if you put 30d here it would mean that any date after October 1 would be disabled, and customers could only select start and end dates within 30 days.
Minimum Period #
For entry in this field use the following: 1d = 1 day, 1w = 1 week, 1M = 1 month, 1m = 1 minute, 1h = 1 hour, 1y = 1 Year, 1s = 1 second
Refers to the minimum rental period, so if you wanted to force your customers to rent for a minimum of 3 days you would put here: 3d
Maximum Period #
For entry in this field use the following: 1d = 1 day, 1w = 1 week, 1M = 1 month, 1m = 1 minute, 1h = 1 hour, 1y = 1 Year, 1s = 1 second
The maximum time a rental can last, so if you wanted a maximum rental period of 3 months you would put: 3M
Show minimum and maximum rental period on product details page #
On the product page you can show the minimum and maximum rental periods if this setting is enabled
Turnover Time and Rental Start Padding #
Show turnovers on calendar #
This will show the turnover time on the calendar as the customer chooses their rental dates. This will help your customers to determine why certain dates may not be available.
Start date padding #
For entry in this field use the following: 1d = 1 day, 1w = 1 week, 1M = 1 month, 1m = 1 minute, 1h = 1 hour, 1y = 1 Year, 1s = 1 second
Start date padding is how long from now (current date/time) should be unavailable. So if you for example did not want people to be able to rent for the current day as the start date, you could put: 1d and it would not allow rentals until tomorrow.
How is Start date padding different than Turnover Before? #
Start date padding starts from now (current date/time) whereas Turnover Before is calculated from when the rental starts. Use turnover before if you are shipping out products or need a lead time between every rental order. Use start date padding if you want to prevent people from renting something within X time from now.
Turnover Before #
For entry in this field use the following: 1d = 1 day, 1w = 1 week, 1M = 1 month, 1m = 1 minute, 1h = 1 hour, 1y = 1 Year, 1s = 1 second
This is turnover time or buffer lead time before the rental start date. This is useful if you need time to deliver or ship the rental, or get it ready for pickup. So if you put here 2d meaning 2 days and the rental starts on September 5, the inventory would actually be reserved (unavailable) starting on September 3.
Turnover After #
For entry in this field use the following: 1d = 1 day, 1w = 1 week, 1M = 1 month, 1m = 1 minute, 1h = 1 hour, 1y = 1 Year, 1s = 1 second
This is the time after the rental end date that the inventory is still reserved. This time can be used for return shipping, cleaning, or other things that need some buffer/turnover time. So if you put 3h here for example and the rental ends on September 3 10am, then the inventory is reserved out until September 3 1pm.
Inventory #
Reserve inventory #
This determines what order status or invoice status will actually reserve inventory. We recommend setting this to “with no invoice” as usually even if an order has not yet been invoiced yet (paid) you will want to reserve inventory to prevent overbooking.
Reserve inventory starting with the send date #
Usually the inventory is reserved starting with the reserved start date. If this is set to Yes if the order is sent earlier the start date will become the send date. For example if the start date was September 5 and you has this setting set to: “Yes” and then you ship the order on September 3, the start date for the rental will become September 3. The order price will not change.
Reserve inventory ending with return date #
Usually the inventory is reserved until the end date, but in this when set to “yes” and a return is made (early or late), the end date will become the return date.
Reserve inventory until the item is returned in inventory #
This will reserve the inventory indefinitely past the end date until the rental is actually returned. Most people want this set to “no” so that their inventory can be reserved more. For example say you have this setting set to “yes” and have 1 product in inventory, and it is reserved for September 1 – 5. No one will be able to reserve this product after September 5 until this product is marked returned. So basically future bookings are not allowed once the inventory is reserved once and not yet returned.
Allow Overbooking for all products #
When overbooking is enabled – it means that inventory is totally ignored. For example you may have 5 quantity inventory for a product, but if overbooking is enabled you would take 100+ bookings for the same dates rather than a maximum of 5.
Admin is allowed to overbook all products #
If the admin can overbook products (does not affect the customer side website). So in the admin order creator in Sales > order > create order the admin can overbook products and ignore inventory.
If Admin is allowed to overbook then a warning will show if overbooking #
Recommended: Yes. On the admin order creator (sales > order > create order) a warning will show to the admin if they are overbooking a product.
Pricing
Add to price calculation number – Count an overnight rental as 2 days #
This is used to add time to each rental that is calculated into the rental price. The most common use for this setting is to make an overnight rental which by default is counted as 1 day rather count as 2 days. If you want an overnight rental to count as 2 days put in this field: 1d which will add 1 day to the rental price.
Number of price points to show in Admin Catalog Grid #
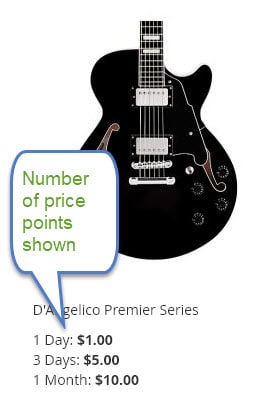
This is in products > catalog and affects the number of price points shown. This grid can get very big if your products have a lot of price points so therefor this setting is here and set to 1 by default.
Special Pricing Dates #
Coming soon – this will allow applying discounts or markups to rental pricing during certain dates.
Category / Listing Page
Number of price points to show
How many price points to show on the product listing (category) pages, refers to this:
Show next available date #
If the next date available is shown on the product listing (category) pages.
Sort Price List by Period #
You may have your prices entered in the admin but not in order, for example 4 hours: $2, 2 days: $7, 1 day: $4, 1 hour: $1 this will put them in order from the shortest to the longest rental period.
Sort Price List Type #
Goes with the setting above of sorting the price list by period. If you want the longest rental period first and shortest last (DESC), or shortest rental period first and longest last (ASC).
Show prices in table format on product view #
With table format enabled would look like this:
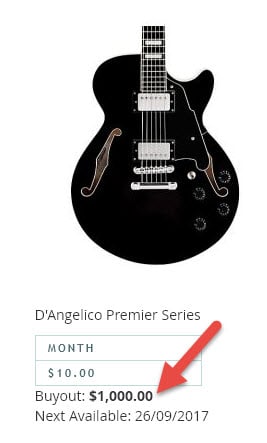
Show buyout price on listing page
Buyout is the price to purchase a rental product (can be enabled or disabled on the product edit page > rental section). If enabled, the buyout price will show like this:
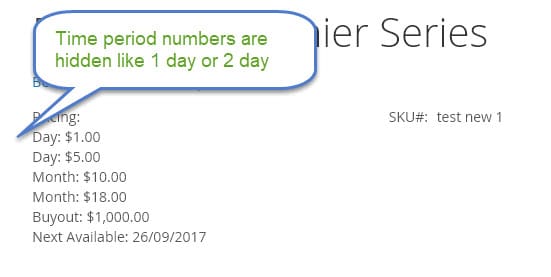
Hide time period numbers from product info page
You can have the time period numbers hidden so instead of it saying 1 Day: $5 it would just say Day: $5 example:
Product Details page #
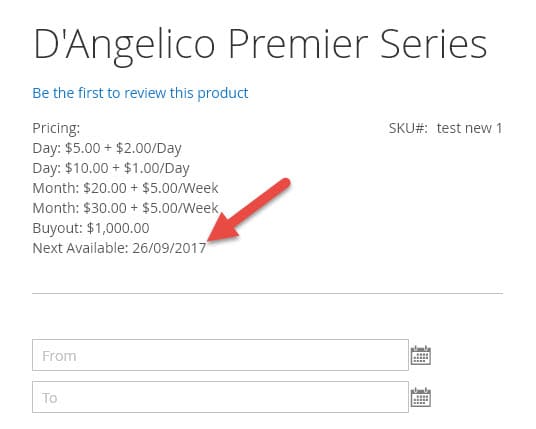
Show next available date #
Whether it shows on the page the next available rental date
Additional time period display preference #
This affects the price additional prices (you do not have to use these it is optional) that are entered on the product edit reservation price grid as seen here:
If this is set to “+ price/period” the pricing would show like this:
If it is set to Extra Period: Price it would show like this:
Hide additional price would not show the add-on price even if it is entered:
Store Hours / Holidays / Blackout Dates #
Hour for Next Day #
Hotel / Property Rental Mode #
This will allow people to end a reservation and start a new reservation on the same day (this affects rentals that do not use time of day). So say you have a reservation that starts on September 1 and ends on September 2, you would accept another reservation to start on September 2 (rather than blocking out that whole day). This is common for hotel reservations where one person checks out and another person checks in on the same day.
On a technical level this is what happens. Normally if you reserve a rental from September 1 – September 2 when not using times it will reserve the product from September 1 12:00am until September 2 11:59pm. When hotel mode is enabled it will instead reserve from September 1 12:00am until September 2 12:00am (this is stored in the start date with turnover and end date with turnover fields visible in the inventory report) so that when the inventory check is done September 2 will still be allowed as a start date.
Time Increment On Time Of Day Drop Down Fields #
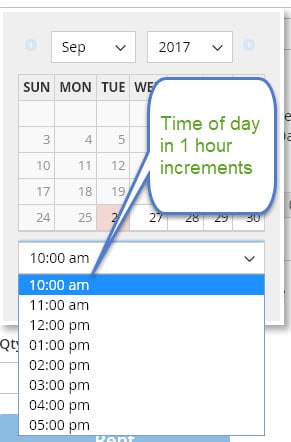
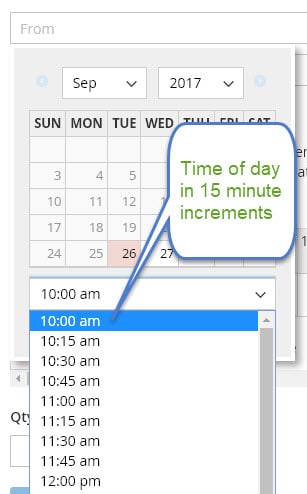
On the edit product page of the admin you can enable products to have time of day. On these time of day drop downs that list out the times of day you can have it in increments of 15 minutes, 20 minutes, 25 minutes, 30 minutes, 45 minutes, or 1 hour. The default is 1 hour.
Example with 1 hour:
Example with 15 minutes:
How is time shown on calendar. If set to yes AM/PM is used.
Store Open Time #
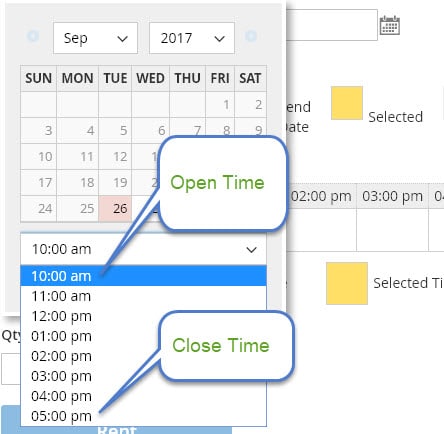
Time the store opens, this will affect the time of day pickers on the calendar.
Store Close Time #
Time the store closes, this will affect the time of day pickers on the calendar.
Store Open Time (Monday – Sunday) #
When set, these will override the Store Open Time or Close Time for that specific day when choosing it on the calendar time of day picker.
Exclude Dates From Price or Calendar or Turnover #
These are dates that you want to exclude from one or more of the following (control + click to select multiple options on the Exclude From field:
Calendar – not able to choose these dates on the calendar
Price – these dates are not calculated in the rental price. Example if September 3 – 4 are excluded and the rental is from September 2 – 5 it would only count as 2 days not 4.
Turnover – this means these dates will not count as turnover time. Example: you have turnover time set to 1 day after and you have a rental from January 1 – 2. You have January 3 as a blockout date excluded from Turnover. So January 4 and 5 would be your turnover days (will not use January 3) and next available rental date is January 6.
All Day: If you check the “all day” checkbox the start date and end date will ignore the time of day so if you put October 1 10am it would ignore the 10am and just make it October 1.
Repeat: These excluded dates can repeat daily, weekly, monthly, or yearly. So for example if you wanted December 25 excluded from the calendar for each year it would look like this:
Disabled Days of week for start date #
Days of the week to exclude on the start date from the calendar, price, and/or turnover which can be chosen below in “Exclude disabled days of week from price, calendar, turnover”
Disabled Days of week for end date #
Days of the week to exclude on the end date from the calendar, price, and/or turnover which can be chosen below in “Exclude disabled days of week from price, calendar, turnover”
Disabled Days of week for both start date and end date #
Days of the week to exclude from the calendar, price, and/or turnover which can be chosen below in “Exclude disabled days of week from price, calendar, turnover”
Exclude disabled days of week from price, calendar, turnover #
Control + click to select multiple options
Calendar – not able to choose these dates on the calendar
Price – these dates are not calculated in the rental price. So if you had chosen Saturday/Sunday a Friday to Monday rental would only count 2 days for the rental price not 4.
Turnover – this means these dates will not count as turnover time. Example: you have turnover time set to 1 day after and you have a rental from January 1 – 2. You have January 3 as a disabled day excluded from Turnover. So January 4 and 5 would be your turnover days (will not use January 3) and next available rental date is January 6.


