
Change The Default Language #
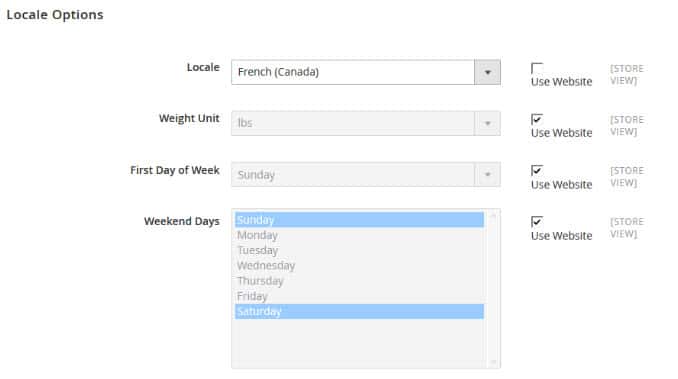
Go to admin > stores > configuration > locale options and change the Locale to the one you want.
Have More Than One Language With A Selector #
You will first need to add a store view. Go to admin > Stores > All Stores > Create Store View and create a new store view for the language you want, name it the name of your language. You can give it a short code like “fr” for french.
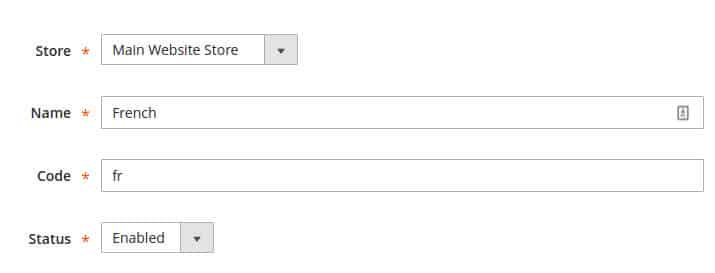
After you have saved it change to that store view with the selector on the top left:
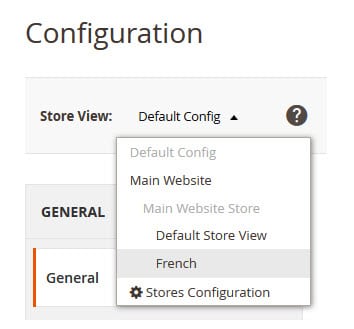
Now go to admin > stores > configuration > locale options and change the Locale to the one you want, but first you will need to uncheck the “use website” checkbox
Use Sub-Domain or Domain Name For Each Language #
This is possible, but out of scope for this document, please see: Multi-Store Setup
Installing A Language Pack #
You can find language packs in a few places:
- The official marketplace area for language packs
- Google for “Magento 2 French Language Pack” of course substituting the name of the language you are looking for. Generally they will tell you how to install the language pack with command line instructions. For example if you google “Magento 2 spanish language pack” you will find this page: https://github.com/Magento2Translations/language_es_es and on this page it gives the command line commands to run. Run these, then of course you will still need to change your locale as described above in admin > stores > configuration > locale options.
- Mageplaza has added quite a few of the official language packs from “crowdin” in an easier to install format, checkout: https://www.mageplaza.com/kb/magento-2-language-pack/ they have command line instructions for each one.
Adjusting Translations For The Rental Module #
Translations for our module are in vendor/salesigniter/releaserental2/i18n folder, within this folder you see a bunch of language files. If there is not a language file for your language please tell us and we’ll generate it for you using Google Translate. Since the non-english files are generated using this method they may not be correct translations, you can edit them in this folder and send us the edited .csv file so that it will be updated on our main extension. If you just want to edit a few translations there are a few methods to do so shown here on our docs: Editing Text & Emails
Special Note About Custom Options Used for “Start Date” and “End Date” Text On Shopping Cart, Invoices, Etc.
The calendar uses custom options of Magento 2 to log the start and end dates. These need to be translated in one of two ways:
- Mass update using spreadsheets specifically the “custom_options” field
- It can also be translated one by one by editing the custom options names on the edit product page making sure you are editing for the store view that you want to have with the translation
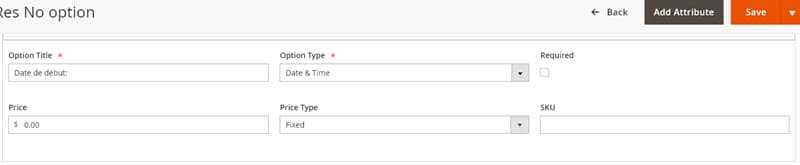
Using either of these methods it is important that you use the same exact translation text for “Start Date:” and “End Date:” (including colons) as is in the language file for your language for these 2 texts, we will use as an example the vendor/salesigniter/releserental2/i18n/fr_FR.csv file:
"Start Date:","Date de début:"
"End Date:","Date de fin:"
"Rental Buyout:","Rachat de location:"
So unless you have modified the translation for French in this example you would need to put for those custom options “Date de début:”, “Date de fin:”, and “Rachat de location:”. Otherwise if you don’t, it will duplicate the custom option. Example in admin edit product:
Example Language Translation and Example English Language Tweak
We will briefly describe one method specifically for languages though if you just want to change a few translations using your theme folder. We’ll suppose you are using the default Luma theme, if you aren’t your theme may be in app/design folder. So say we want to modify 2 translations, one for the English website and one for the Italian website.
Make a file in vendor/magento/theme-frontend-luma/i18n/it_IT.csv for the Italian translations, here we’ll change the “Disabled Date” text which by default translates to “Data Disabilitata” and instead change it to “pericolo non disponibile” The format of this files is a comma separated value within quotes and the first column is the text to translate which should always be English and the second column is the translation. So this file will look like:
"Disabled Date","Pericolo non disponibile"
Now let’s say we want to change on the English website the text “Send items” to say “Check Out Items” so in this file vendor/magento/theme-frontend-luma/i18n/en_US.csv we put:
"Send items","Check Out items"
After that is done you need to flush the Magento 2 cache and redeploy static contents using in command line:
php bin/magento c:c
php bin/magento s:s:d
If you aren’t in production mode manually delete this folder: pub/static/frontend in order to flush any cached javascript translations
Right To Left Languages (Arabic, Hebrew, Farsi) #
Since version 1.2.197 the rental calendar renders right to left in a right-to-left locale, including the popup calendars. Before that release the calendar always laid out left to right, so on an Arabic or Hebrew store view Saturday sat where the customer expected Sunday. Nothing has to be switched on: set the store view’s locale as described above and the calendar follows it.
How Rental Dates Are Displayed #
A rental start and end date is stored in one fixed format and formatted separately for display, so the way a date reads to a customer is a setting rather than a translation. Go to admin > Stores > Configuration > Sales Igniter Rental > Rental Date Output Format (added in version 1.2.197).
There are three settings, and they are deliberately separate because the same shop often wants different things in each place:
- Emails — order, invoice, shipment and rental reminder emails.
- Orders — the admin and customer order views, invoices, shipments, credit memos and PDFs.
- Shopping cart / checkout / mini cart.
Each one can be:
- Store locale — the default, and exactly what every store did before 1.2.197: the store view’s own locale, medium date and short time. Leave all three here and nothing about your store changes.
- One of fourteen presets, from
2026-06-23through23.06.2026and23 June 2026toTue, Jun 23, 2026 10:00 AM. The list shows a worked example beside each one, so you pick the format you can see rather than a pattern you have to decode. - A custom pattern, either a PHP
date()pattern such asD, d M Y H:ior an ICU pattern such asEEE d MMM yyyy HH:mm. Choose which of the two you are writing with the pattern type field beside it. A custom pattern is used exactly as you write it.
Two things worth knowing before you choose:
- A preset with no time in it still shows the time on products that are hired by time of day. Picking a date-only format does not quietly drop the pick-up hour from a two-hour jet-ski booking. Presets that do include a time always show it, on every product.
- All three settings can be set per store view, which is the point of having them on this page: a French store view can read
23/06/2026while the American one reads06/23/2026, from the same orders and the same database.
This setting changes how a date is displayed. It does not change how it is stored, and it is not a translation — the words around the date, such as the “Start Date:” and “End Date:” labels described above, still come from the language files and the product’s custom options.
Currency #
This can be set in stores > configuration > general > currency setup


